A beautiful garden is an outcome of commitment, dedication and care. But even the most carefully planned plot can fall victim to unwanted guests, weeds. This is why you need to know how to use a power weeder like an expert to escape backaches with manual weeding.
These persistent plants compete with your crops for water, nutrients, and sunlight, hindering their growth and potentially reducing your harvest. For many of us gardeners, weeding is a difficult and time-consuming activity.
By the end of this guide, you’ll be wielding your power weeder with confidence.
Power Weeder Overview
Just like any skilled artisan has a variety of tools at their disposal, there are different types of power weeders designed to tackle specific gardening problems.
Understanding the strengths and applications of each type of power weeder will help you choose the right tool for your specific needs.
Here’s a breakdown of the most common types:
Rotary Tillers
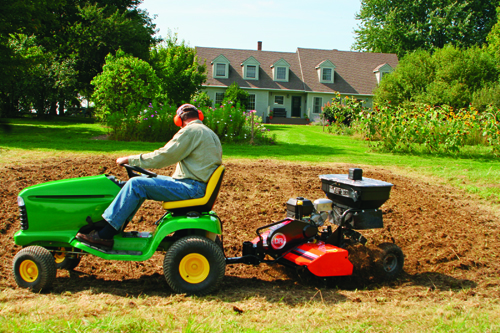
They are also called rotary hoe, rotary tillers and more. These powerhouses utilize a set of spinning blades to not only remove weeds but also break up compacted soil and prepare seedbeds.
They are good for domestic gardeners, and it is ideal for pre-planting cultivation and managing larger areas, rotary tillers offer a powerful solution for gardens with heavy weed pressure or compacted soil.
Tine Weeders
Tine weeding is a very effective way of controlling weeds mechanically. For more targeted weed control, tine weeders employ spring-loaded tines that rotate and penetrate the soil to uproot weeds while leaving established plants largely undisturbed.
These lightweight and controllable machines are perfect for established gardens with delicate crops or closely spaced rows.
Power Harrows
Combining the functionality of a rake and a cultivator, power harrows employ a set of rotating tines that scratch the soil surface, uprooting shallow weeds and creating a smooth seedbed. They are particularly useful for pre-emergent weed control and maintaining a weed-free surface after planting.
How to Use a Power Weeder Like an Expert
To be able to use a power weeder well, you must know what it is made up of and their specific functions.
Features of a Power Weeder
With all the types of power weeders mentioned above, they all have specific parts you will have to understand in order to choose the right one for your garden.
- Engine: This is the heart of the machine, the engine provides the power for the tines or blades to rotate. Engine size will vary depending on the model, with larger engines offering more power for tackling tougher jobs.
- Tines or Blades: These are the workhorses of the power weeder, directly engaging with the soil to uproot weeds. Tines come in various shapes and sizes, with some designed for deep penetration and others ideal for shallow cultivation. Blade options may also be available depending on the model.
- Depth Control: This feature allows you to adjust the working depth of the tines or blades, that is how deep it should go into the soil thereby ensuring you target weeds effectively without destroying the root of your plants.
- Handlebars: They are just like the steering wheel of your car which you control into the direction you want to go. Providing control over the machine’s direction and speed, the handlebars are essential for safe and efficient operation. It is advisable to go for adjustable handlebars that can be customized for your comfort and height.
- Safety Features: Power weeders consider the safety of its users. Look for features like a shut-off switch that allows you to quickly stop the engine, as well as shields or guards to protect you from debris.
Always refer to your manufacturer’s manual for specific safety protocols.
Preparing Your Garden for Power Weeding
To achieve the best outcome of using a power weeder, you must get your garden ready for the weeding process. There are some key things you must consider and put in place before you start.
Soil Conditions
- Moisture Matters: Aim for slightly moist soil. Soil that is too dry will be difficult for the tines to penetrate, preventing the weed from removing. Also, overly wet soil can clump and clog the tines, making operation difficult.
Try to get a consistency that allows the tines to move freely through the soil while still offering some resistance.
- Size of the weed: For better results, target young weeds before they establish deep roots. Large, mature weeds can be more challenging to remove and may require additional attention, such as spot-treatment with herbicide or hand-pulling, before power weeding.
- Consider your crops: Be mindful of the stage of growth of your plants. Newly planted seedlings or fragile young plants require more delicate handling. If necessary, consider hand-weeding around these plants before power weeding the surrounding area.
Ground Clearance
- Remove all rocks: Large rocks and debris can pose a safety hazard and prevent the smooth operation of the power weeder. Before starting, thoroughly scan the area and remove any rocks, sticks, or other obstacles that could damage the tines or cause the machine to jump or bounce.
- Debris Removal: Clear away any dead plant material, leaves, or other organic debris from the surface of the garden bed. This will not only allow for smoother operation but also prevent the power weeder from burying or spreading unwanted materials back into the soil.
Decide on where you want to weed
- Mapping Your Strategy: Before engaging the power weeder, take a moment to plan your weeding path. Consider the location of your plants and any obstacles or delicate areas that require extra care. Plan your route to avoid disturbing these areas as much as possible.
- Marking Delicate Areas: For added peace of mind, you can use markers, such as stakes or colored flags, to visually indicate the boundaries of your plant zones. This will serve as a visual cue while operating the power weeder and help you maintain a safe distance from your precious crops.
Get into Action
Now that you have prepared your garden bed and chosen the right tool, it’s time to get into action with your power weeder. Here’s a few key techniques to operate your machine like a seasoned expert.
Power Up Your Engine
- Safety First: We don’t want to end up weeding ourselves instead of the weeds so you must always adhere to the manufacturer’s instructions for safe engine starting. This typically involves ensuring the power weeder is in neutral and the safety shut-off switch is engaged before attempting to start the engine.
- Familiarize Yourself: Locate and understand the function of all controls before starting the engine. This includes the throttle for speed control, clutch or gear lever and this is depending on the model you go for, and depth adjustment mechanism.
Adjusting the specifics for Efficiency
Setting the Depth
The highest depth for your weeding activity depends on the size of the weeds and your soil type. Go through the owner’s manual for guidance and adjust the depth control mechanism accordingly.
A general rule is to target shallow depths for young weeds and slightly deeper settings for more matured ones.
Finding Your Speed
Start with a slow, controlled pace and gradually increase your speed as you become comfortable.
A slower pace allows for more precise weed removal,especially when finding your way around delicate plants. As you gain experience, you can find the sweet spot between efficiency and thoroughness.
Becoming Better with Your Movements
- Posture and Control: Maintain a comfortable yet upright posture while operating the power weeder. Hold the handlebars firmly for total control and steer the machine smoothly to avoid damaging plants.
- Tackling Obstacles: For obstacles like established plants or raised garden bed borders, utilize a side-to-side rocking motion with the power weeder. This allows you to effectively remove weeds growing close to the obstacle without causing damage.
- Delicate Areas: When approaching delicate areas, consider raising the tines slightly or switching to a narrower weeding path attachment to minimize disruption. Better still, you can hand-weed these areas before power weeding the surrounding space.
Sharpening Your Skills:
- Overlapping Passes: To ensure thorough weed removal, consider making slightly overlapping passes with the power weeder. This helps to catch any weeds that may have been missed during the initial pass.
- Turning Techniques: Practice smooth turns to avoid damaging plants or creating uneven furrows in the soil. Lift the tines slightly as you make a turn and pivot the machine on its wheels.
- Taking Breaks: Operating a power weeder can be physically demanding. Take breaks as needed to avoid fatigue and maintain focus for a more efficient weeding session.
To Wrap Up
Conquering weeds no longer has to be a daunting task. By understanding the different types of power weeders and mastering the techniques outlined in this guide, you can transform your garden from a weed-infested battleground into a thriving oasis.
Always keep in mind that patience and practice are key. With consistent effort and the right tools, you’ll soon be enjoying the fruits of your labor-a weed-free garden that flourishes with healthy, vibrant plants.
So, equip yourself with knowledge and a reliable power weeder, and embark on your journey to becoming a power weeding expert.


